
Philly Cheesesteak (Beef, Onions, Provolone)
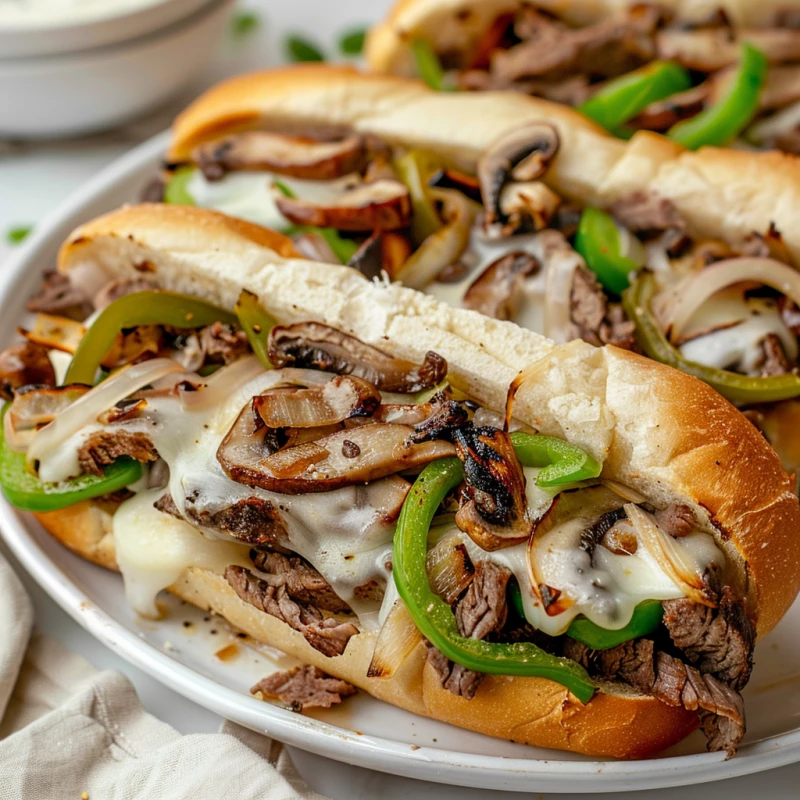
This is the classic Philly cheesesteak setup: thin beef, onions, and melty provolone piled into a warm sub roll. Takes about 20 minutes, and yes, it will drip down your hands like it’s supposed to.
What You'll Need
grocery Ingredients
- Beef or Chicken or Chicken breast or Chicken thigh or Mushroom or Button mushroom or Portobello mushroom or Shiitake mushroom or Oyster mushroom or Enoki mushroom
- Provolone or Queso fresco or Queso blanco or Queso Oaxaca or Requesón
- Onion optional or Red onion or White onion or Yellow onion or Shallot or Green onion or Green onions or Scallions
cooking Equipment
- Skillet or Electric Griddle or Cast Iron Skillet or Electric Skillet or Saute Pan or Flat Top Grill
- Cutting Board optional or Wooden Cutting Board or Plastic Cutting Board or End Grain Cutting Board or Bamboo Cutting Board
- Spatula optional or Silicone Spatula or Wooden Spatula or Wok Spatula
- Chef's Knife optional or Knife or Chef Knife or Santoku Knife or Nakiri Knife or Utility Knife or Mandoline Slicer or Meat Slicer
bookmark_star Instructions
Instructions
1) Get everything sliced and ready
- Slice the onion thin and even. Grab your thinly sliced beef and provolone so it’s not hiding in the fridge like it pays rent.
- Split the sub roll almost all the way (hinge-style). Don’t cut it fully in half unless you like chasing steak bits across your plate.
Pro tip: If your beef isn’t super thin, partially freeze it for 15–20 minutes, then slice it with a chef’s knife. It’s way easier and you’re less likely to do that "why is my knife skating" dance.
2) Toast the roll (optional, but do it)
- Heat a skillet over medium-high heat. Open the sub roll and toast it cut-side down for 1–2 minutes.
- Move the roll to the side. Try not to eat it immediately. I fail this step regularly.
3) Cook the onions
- Add the onion to the skillet and cook it hot for 5–7 minutes, stirring with a spatula.
- You want the onions soft and golden. Don’t crank the heat to "volcano" unless you’re going for crispy regret.
4) Sear the beef
- Push the onions to one side of the skillet. Add the beef to the empty side in an even layer.
- Let it sit undisturbed for 45–60 seconds so it actually browns. Stir and chop it a bit with the spatula to keep the pieces small and biteable.
Common mistake: If you crowd the pan, the beef steams instead of browning. That’s not a cheesesteak, that’s "sad beef bath." Cook in two rounds if you need to.
5) Melt the provolone right on top
- Mix the beef and onions together. Lay the provolone over the top.
- Cover the skillet (a lid helps) for 1–2 minutes until the cheese is melty and gooey. If you skip covering, it’ll still melt… eventually… like your motivation on a Monday.
6) Pile it into the roll
- Scoop the cheesy beef into the sub roll using a spatula.
- Press it in a little so it’s stuffed and stable. Serve right away while it’s still hot and the cheese is doing its stringy thing.
Target doneness: beef browned, onions soft, cheese fully melted
Heat: medium-high (adjust if things start burning)
lightbulb_2 Tips
Pro tip: If the beef keeps turning gray instead of browning, your skillet probably isn’t hot enough. Let it preheat for 2–3 minutes and try again.
Common mistake: Don’t burn the onions. You want sweet and soft, not campfire vibes. If they’re cooking too fast, drop the heat and keep stirring.
Pro tip: Want the true "one-pan mess" experience? Melt the provolone on the beef (like we did) instead of trying to fold slices into the sandwich later. Less wrestling with cheese, fewer tears.
Relatable warning: If you overstuff the roll, it will explode out the back. Ask me how I know. Wrap it in a little foil if you want maximum control and minimum shirt stains.
Swap table:
If you have… Do this electric griddle Cook onions and beef side-by-side with room to spare (less steaming). electric skillet Works great; just preheat well so the beef actually browns. No provolone Use queso Oaxaca or queso blanco (not traditional, but it melts and nobody’s calling the sandwich police).
Want something different?
Try our smart assistant - it will create the perfect menu based on your preferences, available ingredients, and dietary needs.
Try Assistant chevron_rightauto_awesome Similar Recipe
bug_report Found a Mistake?
Help us improve this recipe by reporting any errors or issues you notice.
comment Comments
No comments yet. Be the first to share your thoughts!
Please login to leave a comment